Take advantage of async processes in REST Applications with Java Spring
In this article, we will show you how to take advantage of async processes in REST applications with Java Spring. In a previous article, we discussed how important it is for the software development team to understand a software solution/product’s business logic, and its target functions and features. The main results are a hard focus on what matters most from a business perspective; less reworking; and clean release plans.
But understanding a software solution/product’s goals can also influence some of the small details – for example, what happens when the user clicks a button or link. In the most straightforward scenario, the desired action is executed, and the result is reached/displayed right away (i.e., following a synchronous process). In other cases, the user might need to wait for a result and have parts of the interface temporarily inaccessible/disabled (i.e., during an async process).
The wait/no-wait cases are decided by the product owner and implemented by the software development team as mutually exclusive sync/async processes:
- Synchronous processes allow the user to wait for the result, then have it displayed. Once launched (e.g., by a click), the process cannot be interrupted.
- Asynchronous processes can be launched either by the user or by an automated scheduler, as “fire and forget”: the action is launched but you don’t wait (or care) for it to be executed and for the result to be displayed. Sometimes, a starting message is displayed, and the status can be checked during execution.
Async processes can be used/implemented in many different ways. We look into five concrete situations:
- Sending a notification email at the end of a user operation where other users are also involved
- Uploading multiple documents with the cancellation feature
- Doing some complex calculations in the backend requested by a user action
- Having some automatically scheduled system actions
- Importing big data from an external system into our application
1. Sending a notification email at the end of a user operation where other users are also involved
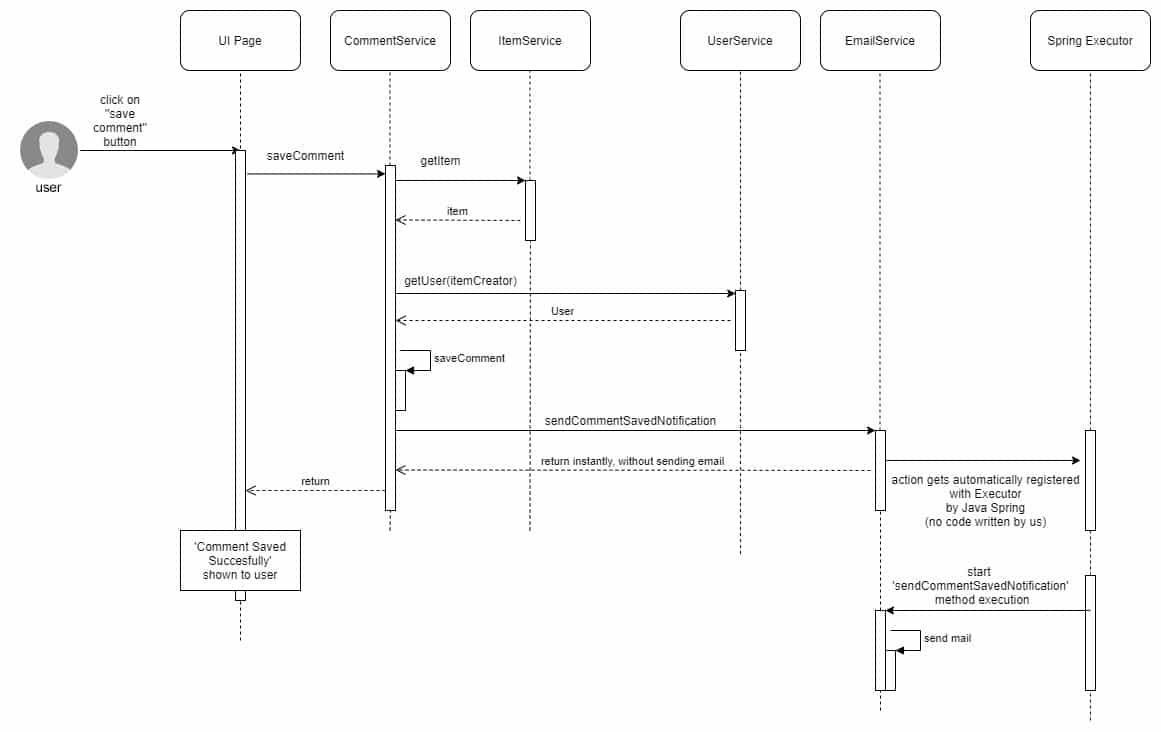
Some of the users will do operations that involve other users as well – for example, leaving a comment on an item created by somebody else. In this case, we want to save the comment in the backend and notify the item’s author about the new comment. Therefore, when the user clicks on “save comment”, the single backend call will do 2 things: save the actual comment and send an email to the item creator.
Saving the actual comment is done instantly, as the requesting user needs the feedback that it was saved. But sending the email is not something that concerns the requesting user, so the backend will trigger an async process, without waiting for the actual result. This means a faster response time for the users and not bothering them with error messages if something goes wrong while sending the email.
public class CommentService {

	public void saveComment(String id, CommentRequest comment) {

		Item item = itemService.getItem(id).orElseThrow(ItemNotFoundException::new);
		User userToNotify = userService.get(item.getCreator).orElseThrow(UserNotFoundException::new)

		commentService.save(comment);
		mailService.sendCommentSavedNotification(userToNotify, comment);
	}
}


public class EmailService {

	@Async
	public void sendCommentSavedNotification(User userToNotify, Item item) {

		MimeMessageHelper mimeMessage = //prepare your email content here
		javaMailSender.send(mimeMessage);
	}
}
@Configuration
@EnableAsync
public class AsyncConfiguration implements AsyncConfigurer {//no special body needed yet}
2. Uploading multiple documents with the cancellation feature
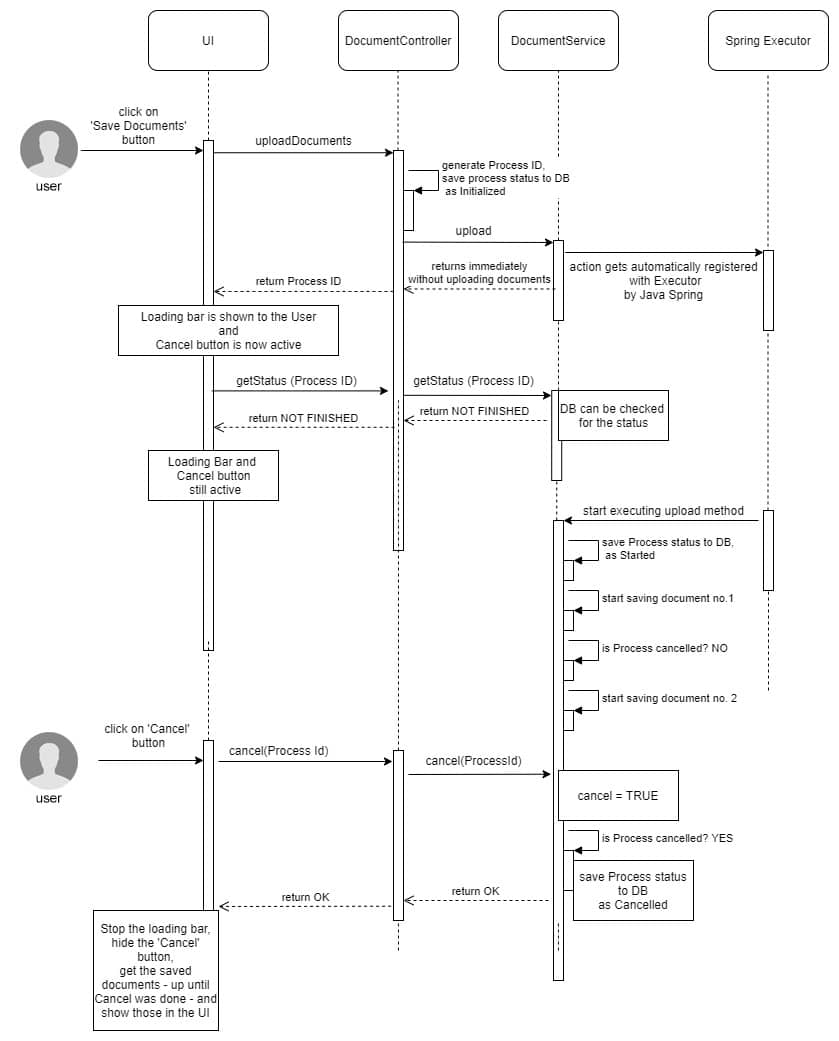
Another usage case is uploading multiple documents at once, in order to attach them to an item. The documents might reside on a third-party server, which means uploading can take some time to complete. While waiting, the user can see a loading bar, and be able to cancel the action.
How does this work?
The frontend sends the documents to the backend and receives a process ID. With this process ID, the frontend can cancel the document uploading at any time (upon the user clicking the Cancel button) by doing a cancel call and passing the process ID.
This can only happen because the document uploading is asynchronous in the backend, and the backend can return the process ID before the upload finishes. In order for the documents upload process to support the cancelation, it has to actively check for any cancel actions, and it needs to know when it’s finished.
We therefore get a more complex process that can be started, finished, or canceled. All these process states are kept in an event table that is used by both the frontend and the backend to track its progress and to show a result to the user when finished (successfully or with errors).
public class DocumentController {

	@PostMapping("/files")//start multiple upload, return processId right away
	public ResponseEntity<ProcessIdResult> uploadDocuments(@Valid @NotNull @RequestPart("files") List<MultipartFile> files,
			@RequestParam("item") String itemId) {
		String processId = ULID.nextUlid();//generate random Id

		documentService.upload(processId, itemId, files); //call async method

		return new ResponseEntity<>(new ProcessIdResult(processId), HttpStatus.ACCEPTED);
	}

	@PostMapping("/cancel")//cancel a specific process
	ResponseEntity<ProcessIdResult> cancelUploadDocuments(@RequestParam("processId") String processId) {

		documentService.cancel(processId); //send cancel event for this processId

		return new ResponseEntity<>(HttpStatus.ACCEPTED);
	}

	@GetMapping("/status")//get the status of a specific process
	public ResponseEntity<ProcessIdStatus> getStatus(@RequestParam("processId") String processId) {

		ProcessIdStatus status = documentService.getStatus(processId); //check status for this processId

return new ResponseEntity<>(status, HttpStatus.OK);
	}

}


public class DocumentService {

	Async//using default Spring thread executor
	public void upload(String processId, String itemId, List<MultipartFile> files) {
		//send start event for this processId
		//start actual upload, checking after each document upload if cancel event was received
		//send finish/cancel/failed event for this processId at the end

	}
}
- an async method,
- process-related events that reflect the current status of the process,
- and a processID that is required by the frontend to check the process status or to cancel it.
3. Complex backend calculations, requested by a user action
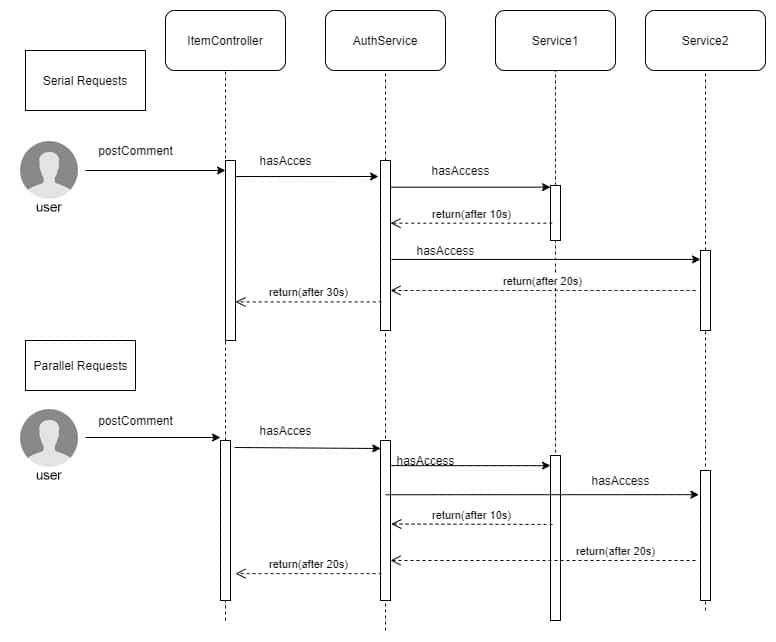
Another usage scenario: the user wants to perform an action, but the backend must check if (s)he is authorised, before actually executing the requests. Depending on the context, the authorisation might not be straightforward, and complex calculations might be needed. In our example below, the authorisation must be checked in multiple places / across multiple services, with each microservice providing its own authorisation result.
More specific: an application user wants to post a comment on an existing item (see 1. above). Depending on the business logic, only specific users might be permitted to post comments. In order to check a user’s permissions, the backend might have to do multiple calls to different microservices. To speed it up, all those calls should be initiated in parallel.
public class AuthorizationService {

	public boolean hasAccess(User user, Item item) {
		List<CompletableFuture<Boolean>> parallelRequests = new ArrayList<>();
		CompletableFuture<Boolean> hasRightsInService1Future = createFutureCallService1(user, item);
		CompletableFuture<Boolean> hasRightsInService1Future = createFutureCallService2(user, item);

		//run the http calls in parallel
		CompletableFuture<Void> combinedFuture = CompletableFuture.allOf(parallelRequests.toArray(new CompletableFuture[]{}));

		try {
			//wait until all are finished
			combinedFuture.get();

			Boolean authorizedInService1 = hasRightsInService1Future.get();//get the actual response of the call
			Boolean authorizedInService2 = hasRightsInService2Future.get();

			return authorizedInService1 && authorizedInService2;

		} catch (ExecutionException exception) {
			throw new CustomException(exception.getMessage);
		}

	}

	public CompletableFuture<Boolean> createFutureCallService1 (User user, Item item) {
		return CompletableFuture.supplyAsync(() -> callService1(user,item), futureExecutor);
	}

	public CompletableFuture<Boolean> createFutureCallService2 (User user, Item item) {
		return CompletableFuture.supplyAsync(() -> callService2(user,item), futureExecutor);
	}


}
Now that we have multiple parallel calls, it’s important to note that each logging should be done within its own thread. For tracking down REST calls, we use Spring Sleuth, an addition to the application logger that creates a traceID for each REST call and appends it to the logs. This is great for synchronised REST calls, but when it comes to async calls, we need to tweak the ThreadExecutor, in order to have a traceID for each Thread.
Adding Sleuth to the application is very easy:
- Just add this line to build.graddle:
compile "org.springframework.cloud:spring-cloud-starter-sleuth"- Then in logback-spring.xml add this property:
<property name="CONSOLE_LOG_PATTERN"
          value="%clr(%d{yyyy-MM-dd HH:mm:ss.SSS}){faint} %clr(%5p) %clr([${springAppName},%X{X-B3-TraceId:-},%X{X-B3-ParentSpanId:-},%X{X-B3-SpanId:-}]) %clr(${PID:- }){magenta} %clr(---){faint} %clr([%15.15t]){faint} %clr(%-40.40logger{39}){cyan} %clr(:){faint} %m%n${LOG_EXCEPTION_CONVERSION_WORD:-%wEx}"/>
@Configuration
@EnableAsync
public class AsyncConfiguration implements AsyncConfigurer {

	@Bean(name = "futureExecutor")
	public Executor getFutureExecutor() {
		ExecutorService executor = Executors.newFixedThreadPool(10);//added executor with 10 Threads
		return new LazyTraceExecutor(beanFactory, executor);//sleuth-specific: now each thread will have a traceId
	}

}
4. Automatically scheduled system actions
Schedulers are async features that are started automatically by Spring, at a specified time. In order to enable scheduling in Spring, we only need to add one more annotation to the AsyncConfig file:
@Configuration
@EnableAsync
@EnableScheduling
public class AsyncConfiguration implements AsyncConfigurer {// body here}
@Component
public class CustomScheduler() {

        @Scheduled(cron=”0 0 0/2 * * ?”)
	public void runScheduledActions(){//scheduler operations here}

}
5. Importing big data from an external system into our application
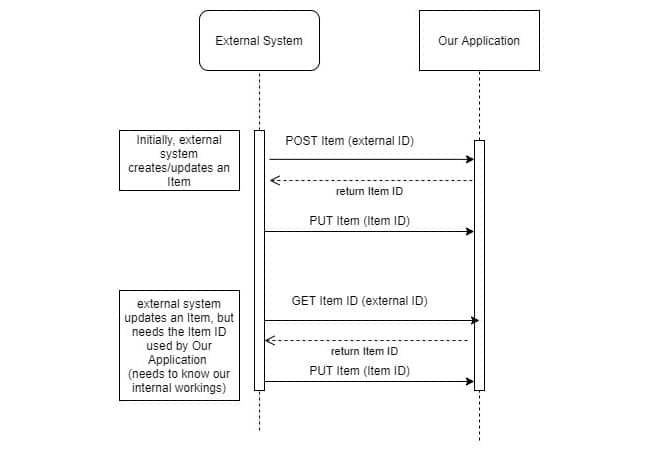
Sometimes, the item objects are created by an external system and imported into our application. The import can be done in two ways:
— A scheduled action on the external system side, that runs every day or at a specified date.
— A triggered action every time a new item has been created in the external system.
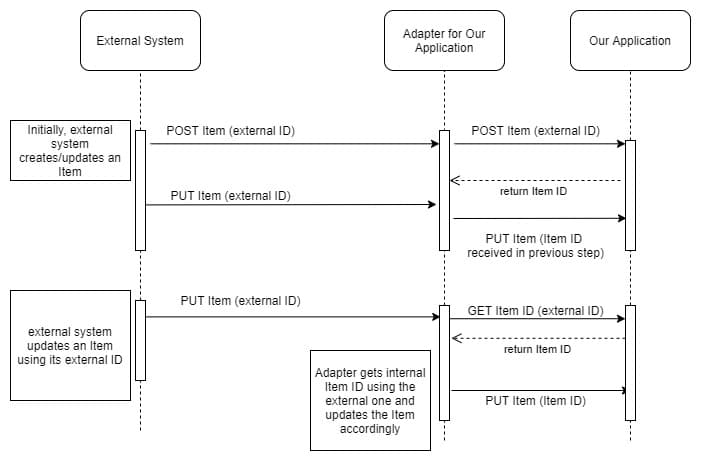
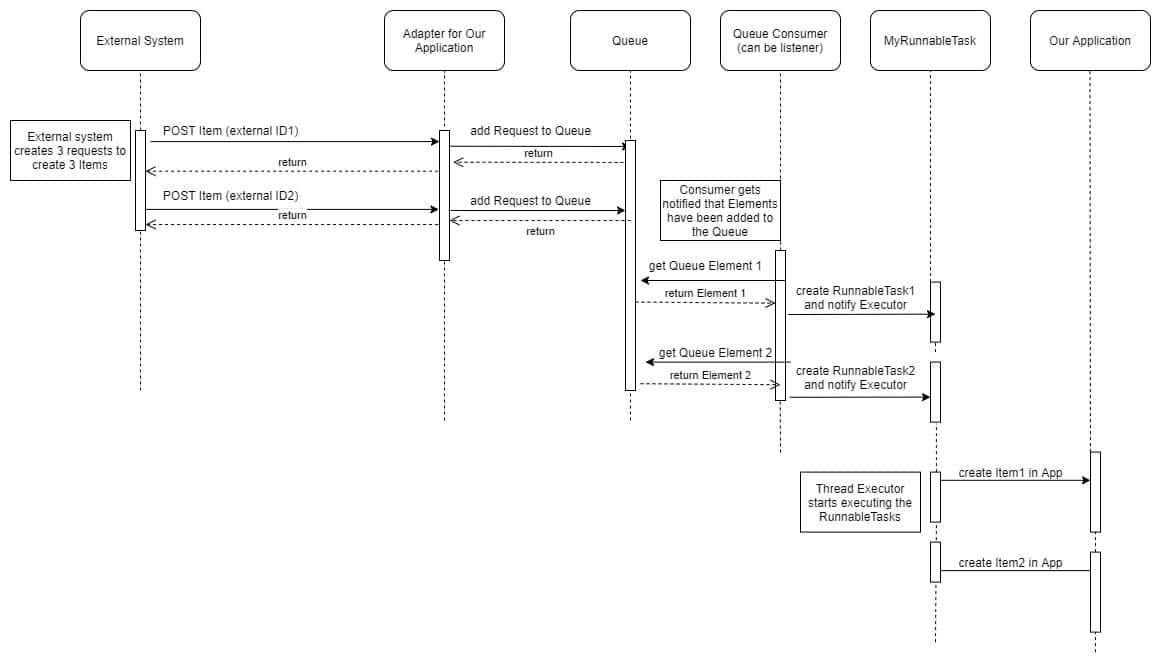
For a triggered import, our application will get item updates (almost) instantly. The downside: if the external system has a lot of simultaneously active users, our application might get a lot of import calls because all the items are created at once. This leads to a communication overload between the two systems, with increased response times to the external system. The external system does a direct synchronised call to our application, therefore any delay from our side means a delay on their side.
public void itemAdded(Item item) {
	MyRunnableTask jobQueueTask = new MyRunnableTask(item);
	jobQueueTask.run();
}


public class MyRunnableTask () {
	private int runId;
	private List<String> usedLocks;

	@Async(“customJobExecutor”)
	public void runImportActions(){//import operations here}

}
Conclusion
Async processes can be used in many ways, with customised executors to help in each individual situation. An important element of the async implementation is whether the result is a “wait for”, or a “fire and forget action”.
Special attention must be paid to parallel executions, especially if they operate on the same entities. Java synchronisation can help, but you also need to make sure that the intermediate objects used in the calculations are not shared between runs.
***
How do you do it? Care to share your solution?

